ShopDreamUp AI ArtDreamUp
Deviation Actions


Description
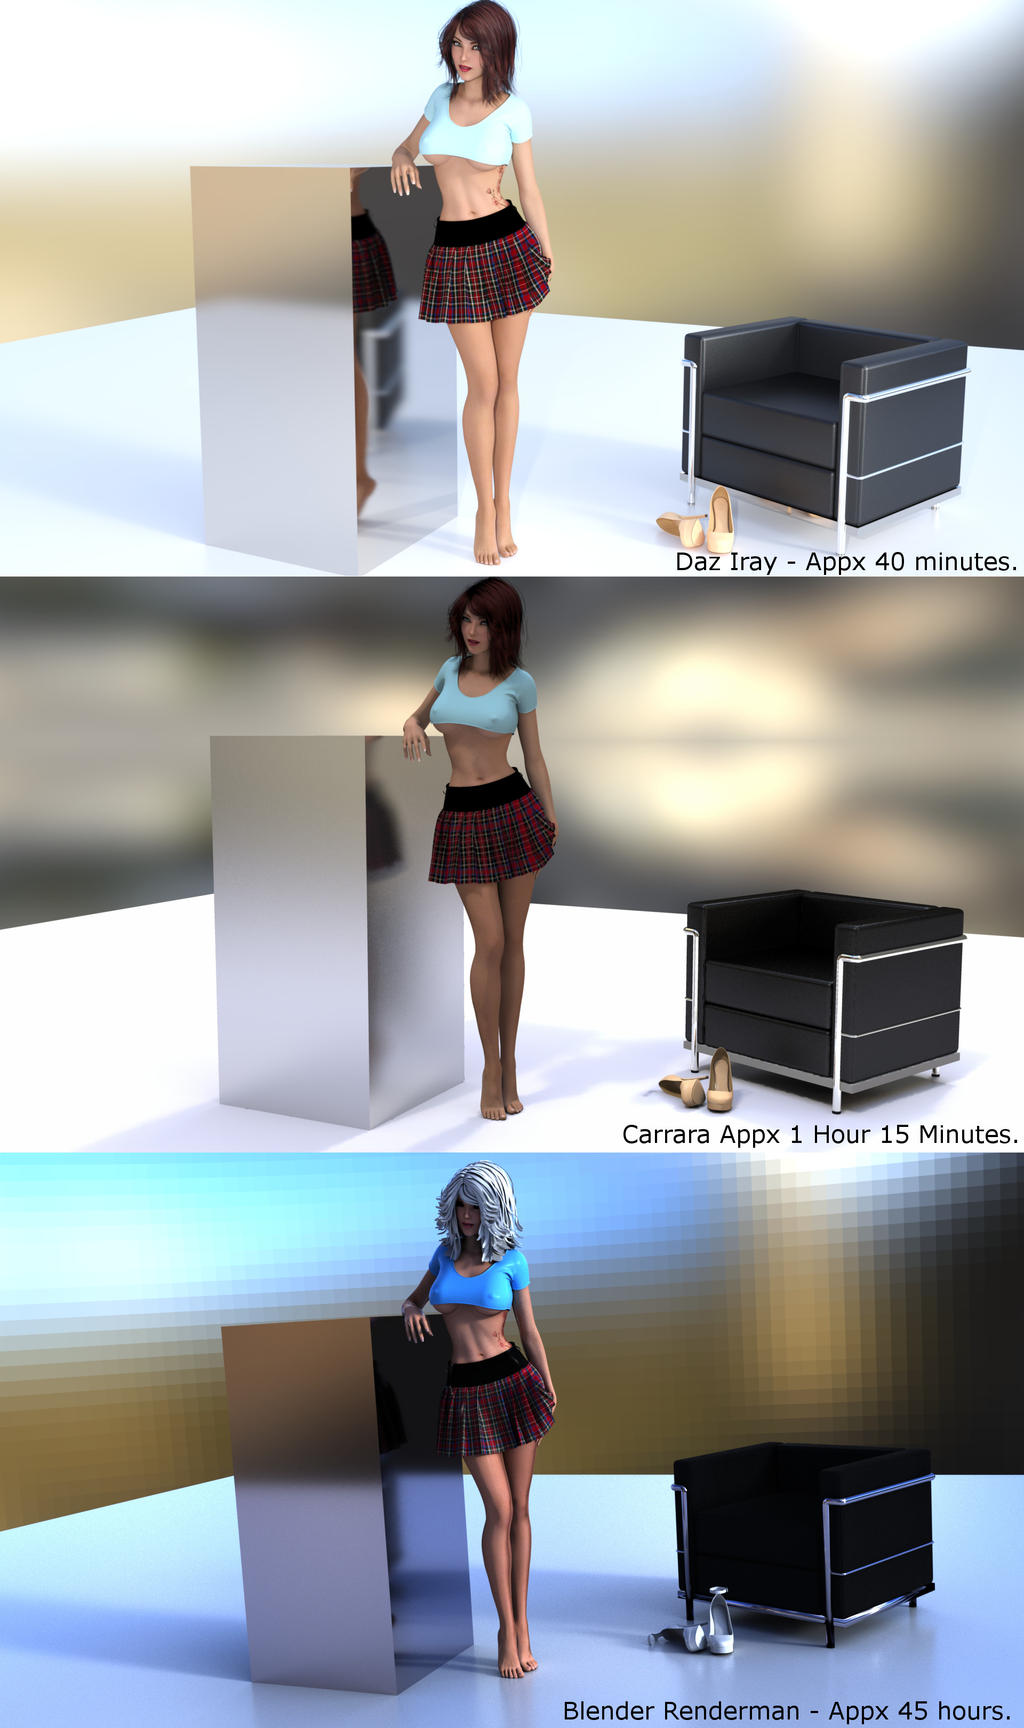
So, I heard some news last week that excited me. This news may be old for some, but I was elated to hear that Pixar had released their rendering software free for non-commercial use. I decided that I'd give it a go. Unfortunately, they only released it as a plugin for certain software. First I tried Maya, a program that (from my understanding) Pixar uses themselves. Not being made of money (at least not enough to afford the full version) I went with Maya LT. This turned out to be a mistake on my part for not fully researching my purchase. Maya LT does not allow 3rd party plugins. For that matter, it doesn't even have a renderer! I figured, Blender would be the way to go as Pixar had released a plugin for it, and the price was right (FREE!). Well, it turns out, Blender has quite the learning curve, at least for me. Especially with a recently released plugin. I won't go over the render times since they're in the image above, but I will describe some of my experiences.
Daz: I did the quick setup in Daz and made a quick outfit from previous creations in Marvelous Designer. Rendered, and exported the entire scene as an .obj file.
Carrara: I had to do quite a bit of tweaking here since Daz does such a good job of making texture applications simple (especially Iray shaders). I primarily ran on muscle memory having worked so often in Carrara for so long. A few tweaks and chasing down install locations, and I was ready for lighting. Getting the lighting from the hdri close to the daz image took a lot of trial and error (and isn't perfect) but in hindsight, I should have kicked up the intensity a bit more. This was, after all, my first Carrara render using hdri.
Blender: Where to begin... Wow, learning curve like crazy after having worked with Carrara and Daz almost exclusively. Compound that curve with a fairly new plugin? The first couple times I hit crtl+z while running the Renderman interactive renderer, it (seriously, the interactive render screen is called "it") Blender crashed. If I was lucky enough to maintain a stable program, sometimes the cube wouldn't show up in it, but she was clothed. Others, the cube would be there, but she was naked (not unusual for my work, but not what I was going for with this image). Finally, after much trial and error, I realized that I needed to import each model individually. This solved the disappearing cube/clothing issue. Also, Blender running Renderman is still VERY unstable. I started a crash count at the beginning of the week, but before the third day, I'd lost count. It crashed A LOT. Which lead me to saving after every couple tweaks. Further, the cube is not the original from Daz, it is a Blender replacement. The replacement was necessary since the Pixar metal shader was rendering strangely. The best I can describe it, was there was some sort of "convex" effect. You can see it a little on the legs of the chair (I didn't feel like recreating the chair legs to get the texture right). No matter how I tweaked the textures in Renderman, I couldn't remove the "glossy-ness" on her skin or the clothing. I also couldn't seem to figure out how to put it back on the chair. Also, alpha masks? Anyone? Blender native, or Renderman? Anyone have a hint for me?
It took me almost a week to get the result at the bottom of the image. Don't get me wrong, I don't blame Blender (or Renderman) for the quality/time of my render, the missing textures you see above are me saying, "Fuck it, I want to see how this looks 'denoised'" and the render time can probably (hopefully) be reduced quite a bit after I've read up on optimization of renders, or after someone else has figured out some good Renderman settings. I know that Blender's Cycles renderer can produce some stunning imagery on it's own and relatively quickly. Some videos I've seen have been scenes as complex as mine in minutes. Yes, minutes. As in under 5. Plus, there's plenty of documentation for using it and Blender's node based shading (which is still a mystery to me). I did notice a nice feature (that I haven't played with yet) for the potential to convert Cycles shaders into Renderman 'pxr' shaders. That might be helpful as there's a ton of tutorials out there for the node based system, but not a lot for the Pixar version which seems to function a little differently.
Now that this post has gone on, probably WAY too long, I'll close by saying: I'm not done with my Blender experiment. There are a LOT of tools and fantastic things that I can learn and play with in Blender. If, along the way, I manage to figure out how to use Blender with Renderman, so be it. But for now, it's probably going to replace Carrara (since Blender is still being supported... Thanks for killing Carrara, Daz *not bitter at all*) for the majority of my object creation, or special effects, maybe, if I can export hair as an obj (please someone tell me this is possible). Anyhoo, if you made it through all of my ramblings, congrats! You win ...nothing.
Image size
1920x3240px 741.19 KB
© 2017 - 2024 soup-sammich
Comments2
Join the community to add your comment. Already a deviant? Log In